High Salvianaut. In this guide I will explain how you could easily do your own salvia-cuttings
with a small amount of work.
Hint: You can click on the images to see them in double resolution. Leave imagewindow open
and all images will be displayed there.
At first the needed materials. You need:
1. a salviaplant from which you can take the cuttings
2. a razorblade
3. small glas (i.e. 7 cm / 3 inch high,5 cm / 2 inch wide)
4. a kind of growing chamber or humidity tent (plastic bag or freezer bag if you have nothing else)
practical are:
5. a spray bottle
6. a lighter or disinfection-liquid if you use an old razorblade
OK lets go.
Take all the needed material.
1. The small glass is nearly total filled with room temperature fresh or old water. Tip from Klaus: "..add a
piece of charcoal to the water to keep it free of contaminants".
2. Now we prepare the growing chamber. Those who only want to use a plastic bag as humidity tent
can skip this part. I built my growing chamber simply out of two empty plasticpots from 1kg
potatosalad, because they have a perfect size. Anything that can keep humidity and is large enough
can be used.
Fill the bottom of the growing chamber (one potatobox in my case) with around 1-3 cm / 1 inch of
simple water. This water will vaporize later and produce a high humidity, which is very important.
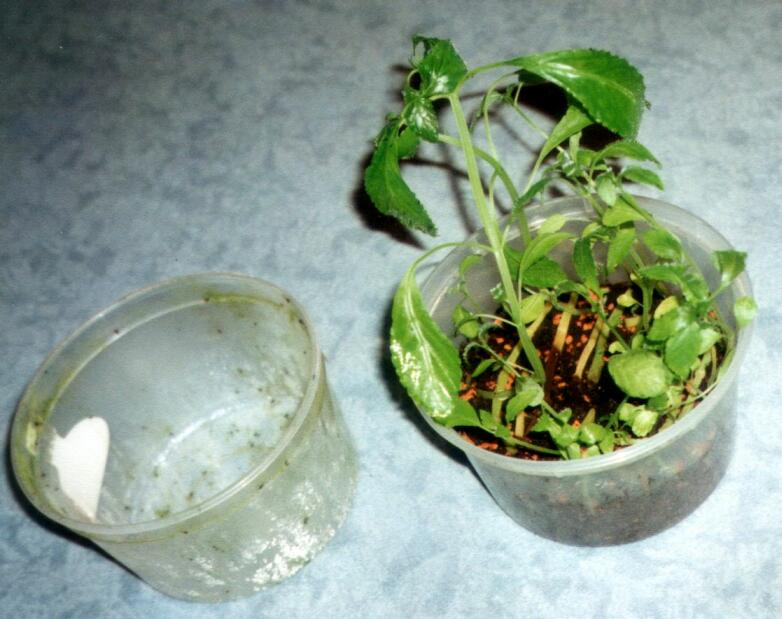
Picture 1
Left: small glas with water
Right: 2 potatosaladboxes used as growing chamber
3. Now we select the cuttings on the motherplant. Its best to take cuttings from the top of a branch with
2-4 leafpairs, because they usually grow best. But its also possible to root an old stempart without any
larger leaves. There only have to be at least one intact node, where the new plants will appear.
Fat stems are better and stronger than thin ones.
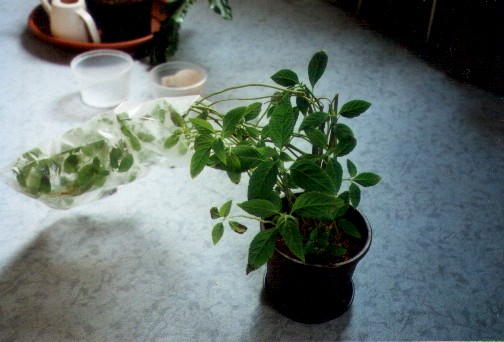
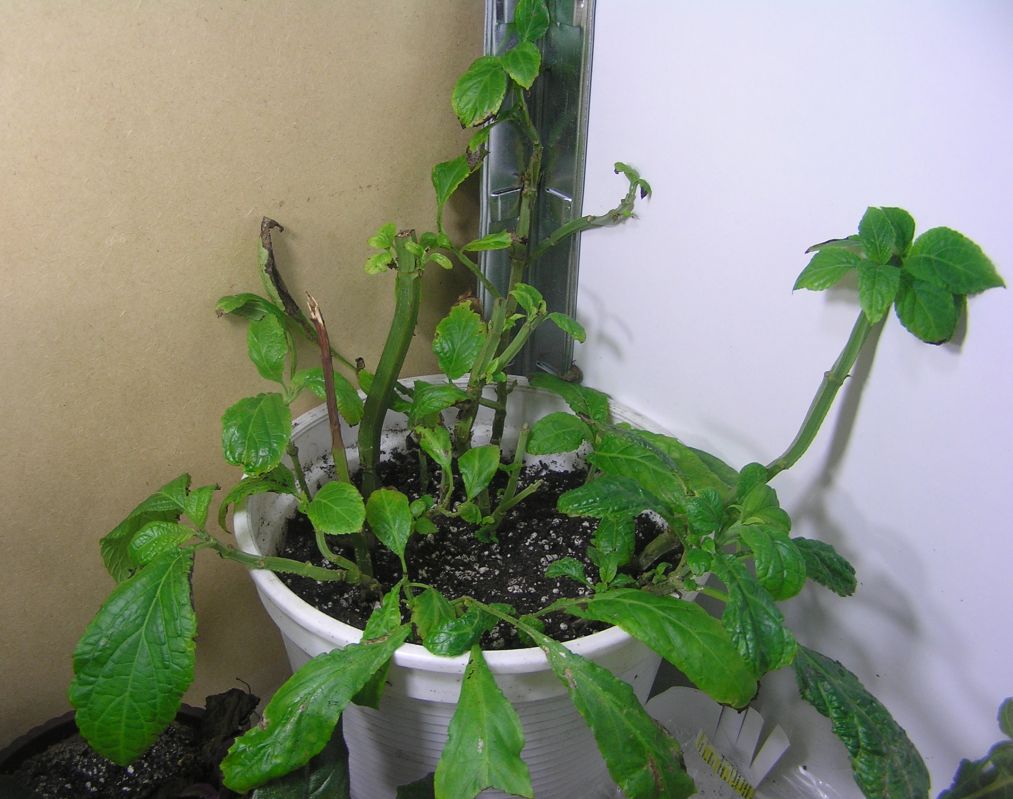
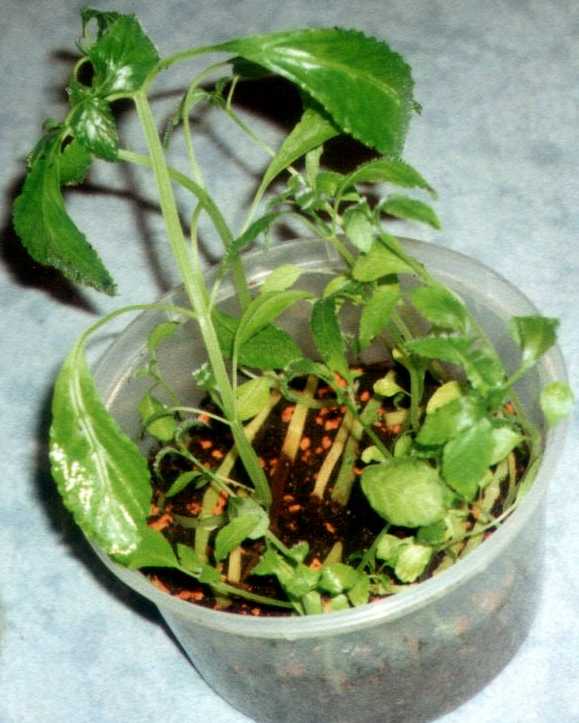
Picture 2
Here is a photo showing a pot full of Salviaplants. The plants grew into the height and then bent
over to the left side (the parts covered with the plastic bag).
At the base grow new nice branches (right,without plastic bag). I took my cutting from the left bent
branches, because they became to long.
4. Now take a fresh razorblade or sterilize an old one with the disinfection-liquid or lighter.
Cut the selected cuttings. A cutting should have at least 3 nodes, but 4-5 are perfect. One node
with healthy side branches is the minimal version.
Cut with the blade around 2-4 cm / 1-2 inch under a node. But its not very important, because Salvia get roots all over
the stem.
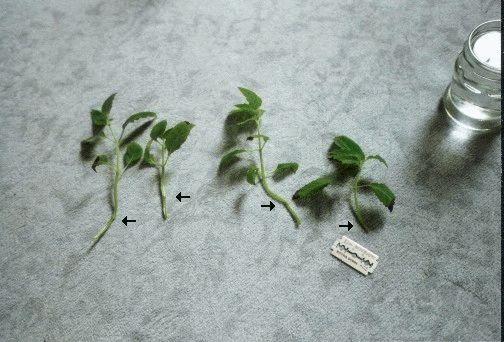
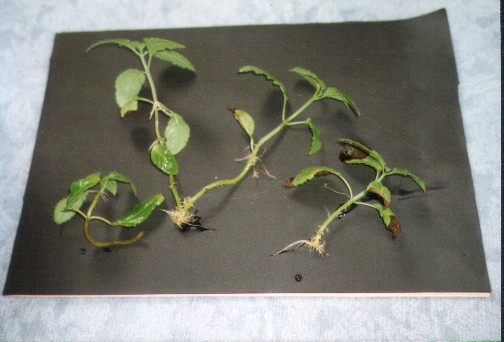
Picture 3
These are 4 cuttings I have taken from the top of 4 branches.
My plants usually have only 3-4 leaf pairs at the top and below a blank stem.
Thats why I choose such branches and cut around 2.5 cm under the first node without any leaves.
(arrows on picture 3).
5. Immediately place each cutting into the small glas with water. You dont need to cut the leaves on the lowest node,
but I favor this.
Cut as many cuttings as you want and can. Its no problem to put several cuttings in one glas, but its maybe
a bit difficult to seperate the roots later. 3-5 cuttings are good for one glas.
6. After placing your cuttings in the glass spray them with the spray bottle.
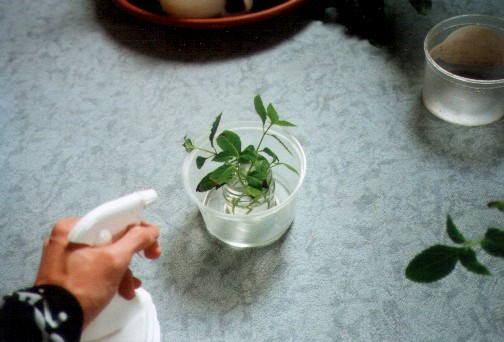
Picture 4
Spraying the cuttings.
7. Now spray also the inside of the the top of the growing chamber. In my case its the second potato salad box
(right upper corner on picture 4). If you use a plastic bag then spray its inside.
Note: You can also skip step 6 and 7. They are only for producing a high humidity from the beginning.
But especially a wet plasticbag can be really nerving if you want to put it over the cuttings.
8. Place the glas in the growing chamber (see picture 4) and close the chamber. I simply put my second potato salad box
upside down on the first one with the glas inside (see picutre 5). Those of you who want to use a plasticbag
can put this simply over the cuttings and the glas. Tighten the plasticbag a bit, so there is not to much
airexchange. A rubber band can work well for holding the plastic bag in place.
9. Place the growing chamber near a window, but not into full sun because of the heat.
Even I successfully rooted some Salvia cuttings in two really dark winter weeks, but in general more
light supports development of the roots.
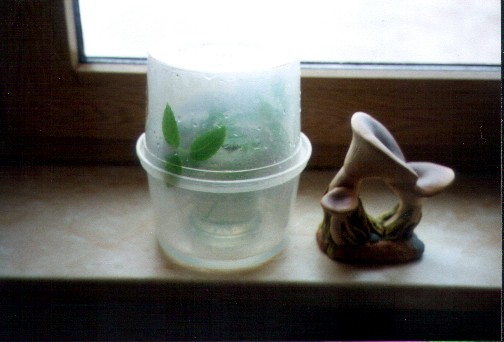
Picture 5
Here my final growing chamber at the window. You can also see the water in the lower potatobox a bit.
10. Care. What care ? If you have done everything right, then the cuttings need no care until they get
roots. The most important factor is the high humidity. The growing chamber can and should be relativ air tight.
Its no problem for salvia to live without air exchange for some weeks. But i would look every second day
at the chamber. If you cant see condensed water, then spray leaves and inside again. But usually this does not
happen.
11. After around 2-3 week the cuttings get roots. The roots can grow up to 1 cm per day. So you should
check the cuttings frequently, because its difficult to pot cuttings with very long roots.
Picture 6
Here are the 4 rooted cuttings. As you can see the most roots appear near the nodes and where you have cut it,
but there are also some in the middle between two nodes. Because of the high humidity the plants
have also rooted directly in the air over the water surface.
At the left cutting you can see a small problem, which occurs sometimes. It can happen that the cutting
bends itself because the lowest part tries to reach the light which usually comes from above.
In extreme cases you have an u-shaped stems which is a bit trick, but possible, to pot in earth later.
The roots on this picture are not so typical. Usually there are fewer, but longer roots.
12. Put he cuttings into your favorite earth mix or growing medium when the roots are 2-3 cm / 1 inch long
13. Spray the potted plants again and cover with a glass, plastic box or plastic bag. The plants have now time
to spread their roots and because of the high humidity they do not hang their heads.
After 1-3 weeks you can let adapt the new plants to your home humidity. Lift the glass / plastic box more and more
or cut holes in your plastic bag if you used one.
I sometimes also like to put a larger plastic bag above the young plants and let them grow under it (works great)
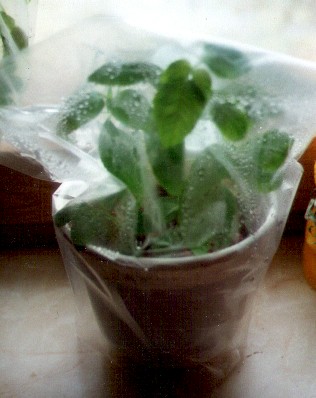
Picture 7
4 rooted cuttings were put together in a small pot. I covered it with a platic bag that has tiny holes.
So I had high humidity but the plants can still breathe because there is air exchange through the tiny holes.
Short time after putting the plants into the earth they continued to grow.
Well thats all. As you can see I use no rootinghormone. Its not necessary with salvia, but I
think it will also do no damage if you want to use some.
With good head cuttings you should have a success rate of 90-100 percent. If a cutting dies, then
its almost always because of stemrot.
Some cuttings get brown stems and the stem dies. This seems to be a kind of infection, which usually
spreads over the whole stem of the cutting. Sometimes it helps to cut the brown part off, but not always.
Alternative Variations, Tips & Tricks:
Ofcourse this is not the only method to do cuttings. Thats why you can read here about variations when
doing cuttings and some tips & tricks to raise success.
Alternative Variation 1:
Because covering the plants and adopting to different humitidy levels is a lot of work and may fail, and because
my plants were adopted to normal room air, I decided to simplify the methode described above and still
had much success.
That works the following way:
Cuttings from plants that already grow at room air humidity can simply be plugged into a glas of water without
covering them. The plants usually can take up enough water without roots. But there fore you should put
them into water immediatly after cutting them. You should use a sharp razorblade knife. Try not to squeeze the stem
too much. The cutting should have not more than 2 or 3 pairs of small to medium sized leaves. Else the cutting
may not take up enough water and you will end up with hanging leaves. Remove or trim bigger leaves.
If a cutting still begins to hang then reduce leave surface a bit by trimming or cutting some leaves. But don't do that
too early, because most cuttings hang a bit directly after cutting them but look better the next days.
Cutting should get roots in 1-3 weeks (average 2) in the glas of water and are ready to put in soil. Water them well after putting them
in soil, so they don't dry out. Maybe cover them for a short time (1-3 days) because depending on the state of the new roots absorbtion
of water may be not sufficient the first days.
But usually covering is also not needed in this phase, so the cuttings had the whole time only the humidity thats
in your room air. This has the advantage that they don't have to adapt to different levels of humidity and this helps
to prevent stress.
At autumn I recycled an old elongated plant.
I only used the best branches and simply put them into a glas of water without covering.
After roots were developed I put them all together in a pot with new soil and watered them well.
Light per energy saving lamp. In some weeks this will be a pot full of bushy plants.
Alternative Variation 2:
Cuttings from plants that already grows at room humidity can simply be plugged into a glas of water without
covering them. The plants usually can take up enough water without roots. But there fore you should put
them into water immediatly after cutting them. You should use a sharp razorblade knife. Try not to squeeze the stem
too much. The cutting should have not more than 2 or 3 pairs of small to medium sized leaves. Else the cutting
may not take up enough water and you will end up with hanging leaves.
After potting the plant into earth water well and dont let the earth dry out. Maybe cover the
plants for the first days because it may not take up enough water from the earth with the sensitive roots
during that time.
Alternative Variation 3:
Peter, a reader from the internet, uses the following method:
"Half part very good gardeningearth, half
part Seramis [or Perlite,Vermiculite], cut with razorblade a cutting and plug it around 1 inch deep into the earth.
Press the earth a bit and water good [cover at the beginning]. Never had failures with this method."
Tips & Tricks:
Tip 1: Light:
Put the cuttings at a light place, but not in full sun. Energy saving lamps (around 20W)
or neon bulbs are perfect because they produce much light but not so much heat.
Tip 2: Temperature:
A temperature higher than 27 degree celcius is not so god, but too cold places are also bad.
20-25 degree celcius semm to be optimal for fast development of roots. I once had some cuttings at a light but cold room
and they didn't wanted to form roots. The waste heat from energy saving lamps or neon bulbs is usually perfect.
Tip 3: Change water regulary:
You should change the water every 2-4 days. Else bacteria will develop rapidly and plants may become slimy.
Remove slushy stems and old leaves before changing the water.
Tip 4: Add active-filter-carbon to the waterglas to keep bacterial infection rate low beside changing the water regulary.
This actions can prevent stem rot.
You can also add some active-filter-carbon to the wound at the stem of the mother plant to lower
the risk of stem rot there.
Tip 5: You can cover the wound of the mother plant with a gelantine from capsules to prevent stem rot. Dissolve some
gelantine capsules into water an brush this solution on the wound of the mother plant to seal it.
Tip 6: Resin for tree wounds - tip by Guschli
Cover the part where you did the cut with resin for trees. This acts as a protection layer and dries out the "wound".
Tip 7: An aquarium bubbler helps the water to stay fresh. The additional oxygene motivates
the cuttings to get roots.
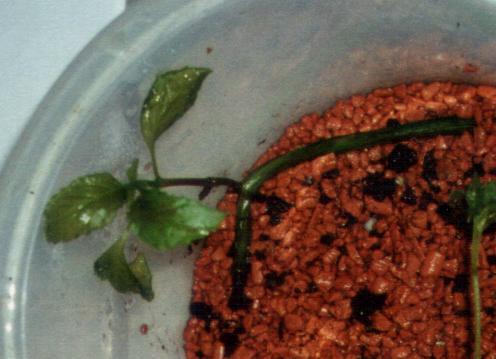
Finally some more commented images from salvia cuttings:
View from top on a stempart, which lay on seramis (something like perlite),
got roots and a new sidebranch.
Rooted stempieces on wet earth with new growth.
The right plastic box with wet earth and the cuttings was covered
with the left plastic box to get a high air humidity.
Rooted stempieces on wet earth - Zoom
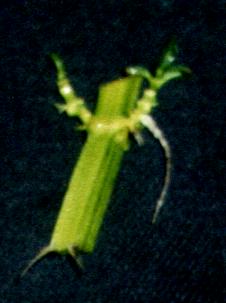
minimal cutting
Rooted stempice around 4cm/1.5inch long with
only one node and two new babybranches on each side of it.
This is the minimal version of a salvia cutinng.
This piece is robust and small, so you can easily send it with mail.
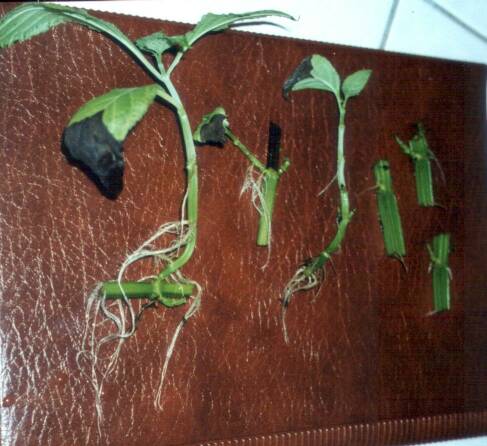
diverse cuttings
right: 3 mininal cutting
left: Sidebranch on an old stem
secong from the left: the upper dark part of this cutting has stem rot
but it doesnt spread over the node in that case
As you can see its not really difficult to do salvia cuttings and let them grow to new plants. And if you have some
plants left then why not give them to good and interested friends and share this wonderful plant.
Good luck
(c) Schizo (
/ www.psykick.de) April 2001, updated: April 2002, May 2005, August 2007
Thanx to David Bower (shenanigans@home.com) for checking most of my translation.